FGM
Fgm Whiteness Hp Maxx
Fgm Whiteness Hp Maxx
Exclusive of GST
Couldn't load pickup availability
Product Description
Whiteness HP Maxx by FGM is a powerful in-office dental whitening system based on 35% hydrogen peroxide, formulated for both vital and non-vital teeth. With a unique two-phase system—peroxide and thickener—this product ensures optimal mixing at the time of application, minimizing waste and enhancing shelf life. Its innovative formula combines special light-sensitive tints and inorganic heat-absorbing loads to accelerate whitening safely and efficiently while significantly reducing tooth sensitivity.
Whether you're treating individual teeth or full arches, Whiteness HP Maxx delivers consistent, visible results in fewer sessions, with or without light activation.
Key Features & Advantages
-
Two-Phase Activation System – Mix only what you need, reducing product waste
-
35% Hydrogen Peroxide Formula – Fast and effective results for both vital and non-vital teeth
-
Light-Assisted or Light-Free Application – Flexible with or without external activation
-
Heat Blocker Technology – Minimizes pulp temperature rise and tooth sensitivity
-
Color-Change Indicator – Shifts from carmine to green to clearly indicate gel removal time
-
Enzymatic Neutralizer (Neutralize) – Quickly addresses accidental tissue contact
-
Neutral pH & Excellent Viscosity – Safer and easier to apply
- High Shelf Life (2 Years) – Maintains efficacy over time
Indications
- Professional dental whitening of vital and non-vital teeth
- Suitable for full-arch treatments or targeted applications
- Whitening retouches or localized procedures
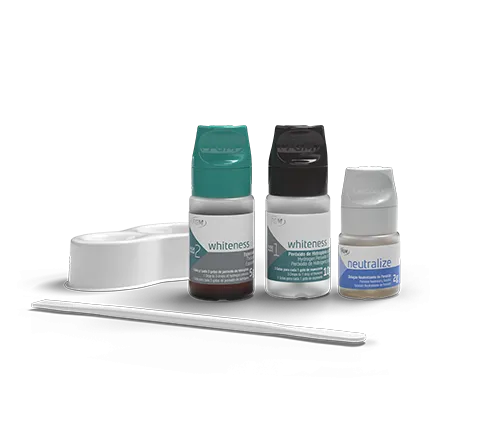
Packaging – 1 Complete Patient Kit Includes:
| Component | Quantity |
|---|---|
| Concentrated Hydrogen Peroxide | 1 x 4g bottle |
| Thickener | 1 x 2g bottle |
| Neutralizing Solution (Neutralize) | 1 x 2g bottle |
| Gel Preparation Plaque | 1 unit |
| Application Spatula | 1 unit |
| Top Dam Syringe | 1 x 1g syringe |
| Applicator Tips | 3 pcs |
| Instructions for Use | Included |
Application Benefits
Up to 18 applications per kit
Allows selective whitening of a single tooth, specific regions, or full arches
Cost-effective for clinics; comfortable and safe for patients
Whiteness HP Maxx redefines professional whitening—delivering faster, safer, and longer-lasting results with unmatched control and comfort.
Features
Features
Description
Description
Specification
Specification
Packaging
Packaging
Direction to use
Direction to use
STEP 1
Prepare the patient according to the whitening case (see instructions for vital and non-vital teeth: Step by Step).
Step 2
Remove the whitener from the packaging observing the safety instructions.
Step 3
Hold the peroxide bottle in a vertical position and carefully open the lid.
Step 4
Prepare the recipient for the mix and the spatula to mix the product.
Step 5
Shake vigorously the thickener bottle in order to homogenize the content. Fail in the homogenization of the thickener can result in a low viscosity gel (insufficient viscosity).
Note: In cases when the whitener is kept under refrigeration, take it from the fridge at least 30 minutes before the beginning of the treatment to allow its temperature to get closer to room temperature.
WHITENING OF VITAL TEETH
Perform a good evaluation of the buccal cavity of the patient; look for cavities, deficient restoration, enamel fissures, recession of the gum, gingivitis or other characteristics that you think must be checked and treated before the procedure. Put in place your and the patient´s protection equipment.
STEP 1:
Select and take the color of the patient´s teeth via a shade guide and/or taking a picture before start the whitening process
STEP 2:
Perform relative isolation with Top dam – light-curing gingival protector (FGM) covering the marginal gum and the buds with a 3 to 5mm wide and 1mm max thickness. The barrier must cover approximately 0.5 to 1.0mm of the dental surface. Use a clinic mirror looking from the incisal to the cervical and observe if there is gingival tissue uncovered. If there is, make the correction. This step is crucial to avoid the contact of the peroxide with the gum. Use a labial retractor to facilitate the barrier and the whitener application.
STEP 3:
Cure the Top dam resin (FGM) using a 20 to 30 seconds light-curing for each group of three teeth. The gingival protector that is formed is rigid and insoluble, avoiding the occasional irritation by aggressive products.
STEP 4:
Using the mixture plaque provided in the kit, mix the Peroxide phase (phase 1) with the thickener phase (phase 2) in the following proportion: 3 drops of peroxide to 1 drop of thickener. This mix quantity is sufficient for one tooth application. For the smile line (10 teeth), normally 21 drops of peroxide and 7 drops of thickener are sufficient. Shake vigorously the thickener bottle before using it.
STEP 5:
With the help of a brush or spatula, thoroughly cover the vestibular surface of the teeth to be whitened, including the interproximal surfaces and extend a little on the incisal and occlusal surfaces. The gel layer should be between 0.5mm and 1mm thick. In case of choosing to use equipment to accelerate the process, start the application of light right after the application of the gel. For each equipment, there is a specific protocol for light exposure times. Follow the instructions of the manufacturer. Considering a photopolymerizer, it is recommended to apply light for 20 seconds on each teeth alternately (generally from pre-molar to pre-molar), maintaining a distance of 5 to 10mm from the surface of the gel. For each gel application, try to apply light twice.
STEP 6:
Leave the gel on the dental surface for at least 15 minutes from the beginning of the application through the end. With the help of a brush or micro applicator, move the gel over the teeth three or four times to eliminate possible oxygen bubbles that might have formed and renew the best contact possible of the gel with the teeth. At the end of the recommended time, clean the gel from the teeth with a suction cannula (for example, an endodontics one) and clean the teeth with a piece of gauze to have them ready for the new portion of gel. Repeat steps 4 through 6 up to twice more (maximum) on the same session, if necessary, depending on the evolution of the results and always monitoring the patient’s sensitivity.
STEP 7:
At the end of treatment, clean the gel through suction and wash the teeth. Remove the gingival protector detaching it with a probe.
STEP 8:
Apply the Desensibilize KF 2% (FGM) for 10 minutes and, right after that, polish the teeth with polishing paste Diamond Excel (FGM) and felt disks Diamond (FGM) or Diamond Flex (FGM).
Check the final aspect after the treatment. Compare before and after photographs.
NOTES:
1 – Monitor the patient throughout the whole whitening process for dental sensitivity and possible peroxide irritation areas. In case any of those is noted, interrupt the process and verify and intervene (see comments in the section Precautions and Side Effects).
2 – If the results obtained do not correspond to the expectations and the patient does not show sensitivity or any other contraindication, the reapplication of the product may be done for a maximum of two more sessions. In the case of an extra session, an interval of at least 7 days between sessions has to be obeyed.
WHITENING OF NON-VITAL TEETH:
Before beginning whitening, take an X-ray of the tooth to be whitenend for the verification of its conditions. The treatment has to be in accordance to acceptable endodontic standards.
STEP 1:
Select and take the color of the teeth of the patient by means of a shade guide or photograph before beginning the treatment.
STEP 2 :
Perform a good opening for exposing the crown removing restorations, cavity-affected dentine, etc. With the pulpal chamber cleaned, deepen the entrance of the conduct removing approximately 3mm of filling for the making of the sealing of the canal (the sealing prevents the diffusion of the whitening agent to the region of the cement and periodontium. It is recommended that the sealing of the canal be carried out with a glass ionomer with a minimum thickness of 2mm for a better sealing).
STEP 3:
Isolate the teeth with Top dam (FGM) and mix the phases of the whitener Whiteness HP Maxx in the proportion of 3 drops of phase 1 (peroxide) for 1 drop of phase 2 (thickener). Generally, 6 drops of peroxide for 2 drops of thickener are enough for one application. Vigorously shake the bottle of the thickener before using it.
STEP 4:
Apply Whiteness HP Maxx on the vestibular face and inside the pulpar chamber with the help of a micro applicator. A layer of approximately 1mm-thick is enough.
STEP 5:
In case of choosing to use equipment to accelerate the process, start the application of light right after the application of the gel. For each equipment, there is a specific protocol for light exposure times. Follow the instructions of the manufacturer. Considering a light-curing source, it is recommended to apply light for 40 seconds on each teeth per vestibule and 40 seconds per palatine or lingual. Wait 5 minutes and apply the light again. Leave the gel to act for the necessary time to complete 15 minutes from the beginning of the application.
STEP 6:
Remove the gel using suction (endodontics cannula) before reapplying the product. Up to three gel applications may be performed in the same session. After finishing the applications of the whitening gel, wash and dry the tooth. Restore temporarily the cavity and follow up the results of the whitening for, at least, a week. If necessary, repeat the application for a maximum of 4 times.
NOTES:
1 – The non-vital tooth restored temporarily, presents a fragile crown and absence of dental structure in its interior. Instruct the patient for the right care for not fracturing the crown of the fragile tooth.
2 – As an alternative, after the removal of the Whiteness HP Maxx, the professional may use the whitener Whiteness Super-Endo (FGM) – carbamide peroxide at 37% for internal use and continue the whitening of the teeth during the interval between sessions with Whiteness HP Maxx (for the use of the whitener Whiteness Super-endo refer to the specific use instructions).
STEP 7:
At the end of the whole whitening process, restore permanently the cavity on the whitened tooth. It is recommended to wait at least 7 days before restoring the tooth (time for the stabilization of the color of the tooth and the elimination of residual oxygen). Check the final aspect of the tooth after treatment.
Additional info
Additional info
Warranty
Warranty
Product Related Questions
Product Related Questions
Share