Bio-Art
Bio-Art PlastPress 220V Vacuum Forming Machine APLT0874
Bio-Art PlastPress 220V Vacuum Forming Machine APLT0874
Couldn't load pickup availability
Bio-Art PlastPress 220V Vacuum Forming Machine APLT0874
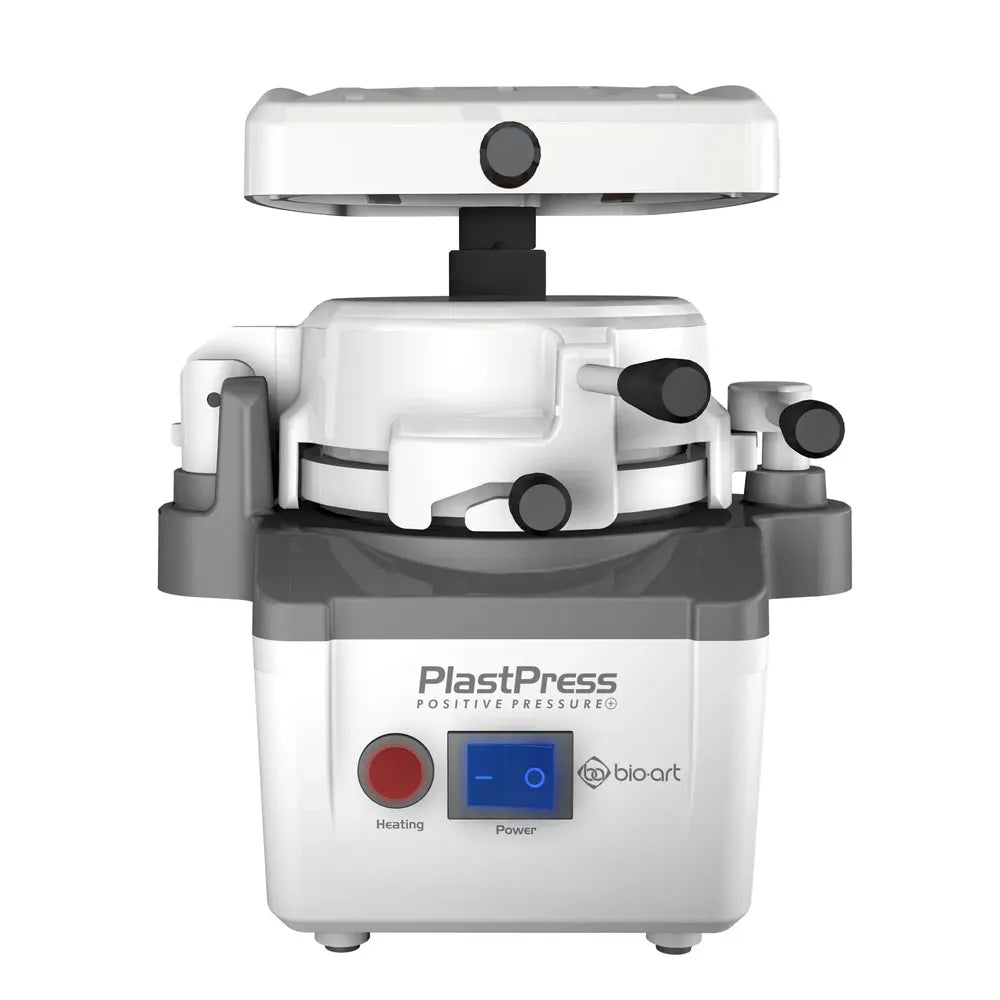
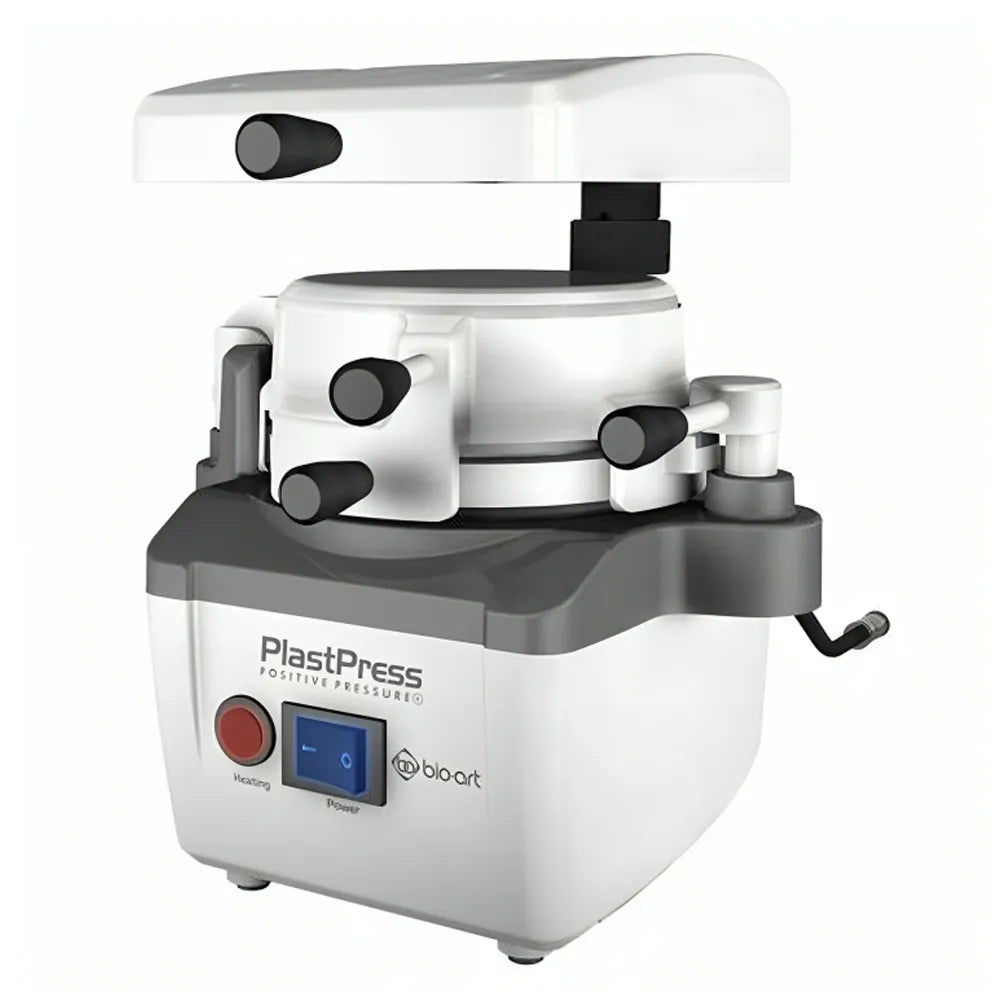
Bio-Art PlastPress Vacuum Forming Machine is a high-quality and reliable device designed for creating precise and accurate dental appliances. This machine is perfect for dental labs, clinics, and educational institutions that require a dependable and efficient vacuum-forming machine. The Bio-Art PlastPress 220V Vacuum Forming Machine APLT0874 features a powerful 220V motor that ensures consistent and reliable performance. It also has a large forming area of 130mm x 130mm, which allows for the creation of a wide range of dental appliances, including mouthguards, splints, and retainers. This machine is easy to use and comes with a user-friendly interface that allows for quick and easy adjustments. It also has a built-in timer that ensures precise heating and cooling times, which helps to ensure consistent results every time. The Bio-Art PlastPress 220V Vacuum Forming Machine APLT0874 is made from high-quality materials and is built to last. It is also compact and lightweight, making it easy to transport and store when not in use. Overall, the Bio-Art PlastPress 220V Vacuum Forming Machine APLT0874 is an excellent choice for anyone looking for a reliable and efficient vacuum-forming machine for their dental lab or clinic.
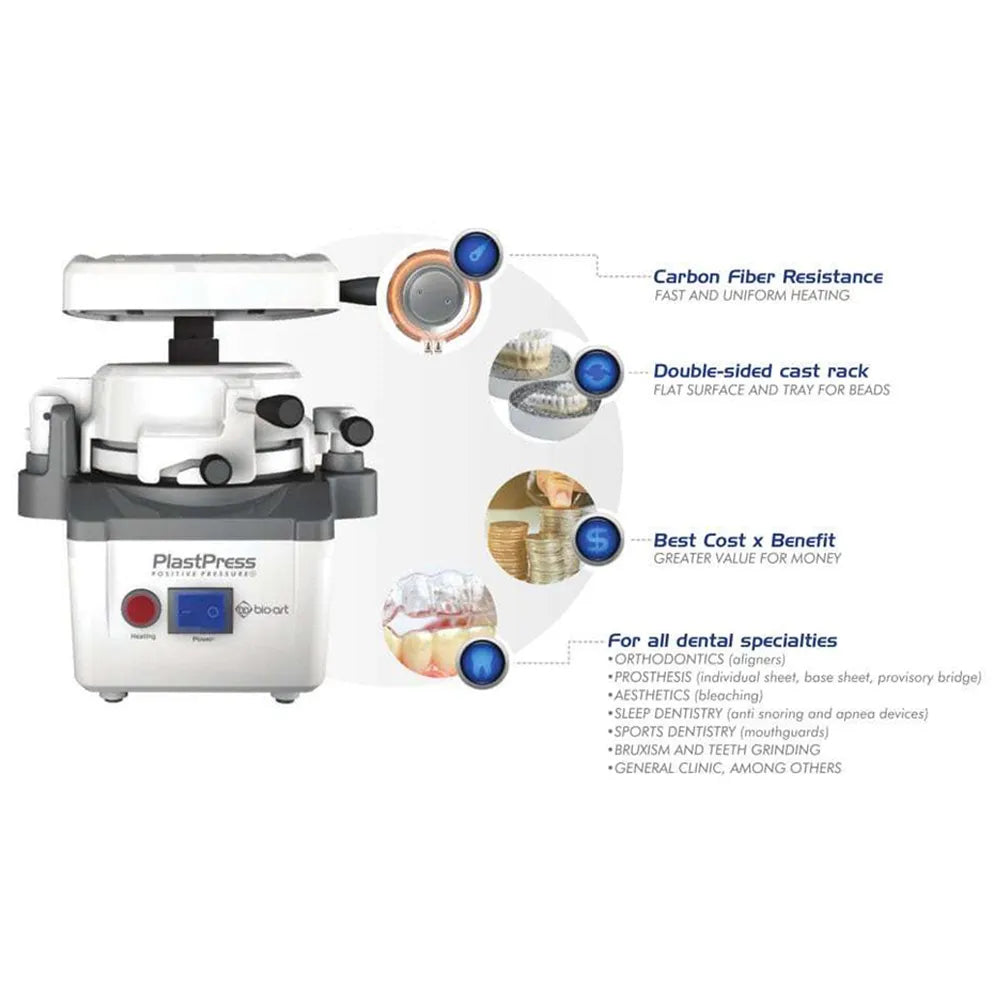
For all dental specialties:
- Orthodontics
- Prosthesis
- Aesthetics
- Sleep Dentistry
- Sports Dentistry
- Bruxism and Tooth Clocking
- General Clinic
Features
Features
- Versatility: The PLASTPRESS BIO-ART is a multi-purpose equipment suitable for various applications in dental laboratories.
- Ease of Use: Designed with user-friendliness in mind, this equipment offers intuitive controls and straightforward operation, making it accessible for dental professionals of all levels of expertise.
- Multiple Applications: With its versatility, the PLASTPRESS BIO-ART can be used for a wide range of dental procedures, including fabricating orthodontic appliances, mouthguards, splints, and more.
- Comprehensive Manual: The accompanying user manual contains all the necessary information about the equipment operation, ensuring users have the guidance they need for effective use.
- Adaptability to Different Materials: The PLASTPRESS BIO-ART is compatible with various types of plates made from different materials and thicknesses, allowing for flexibility in material selection based on the desired application.
- Durable Construction: Constructed from high-quality materials, the PLASTPRESS BIO-ART is built to withstand the demands of daily use in dental practices, ensuring long-lasting performance and reliability.
Description
Description
Specification
Specification
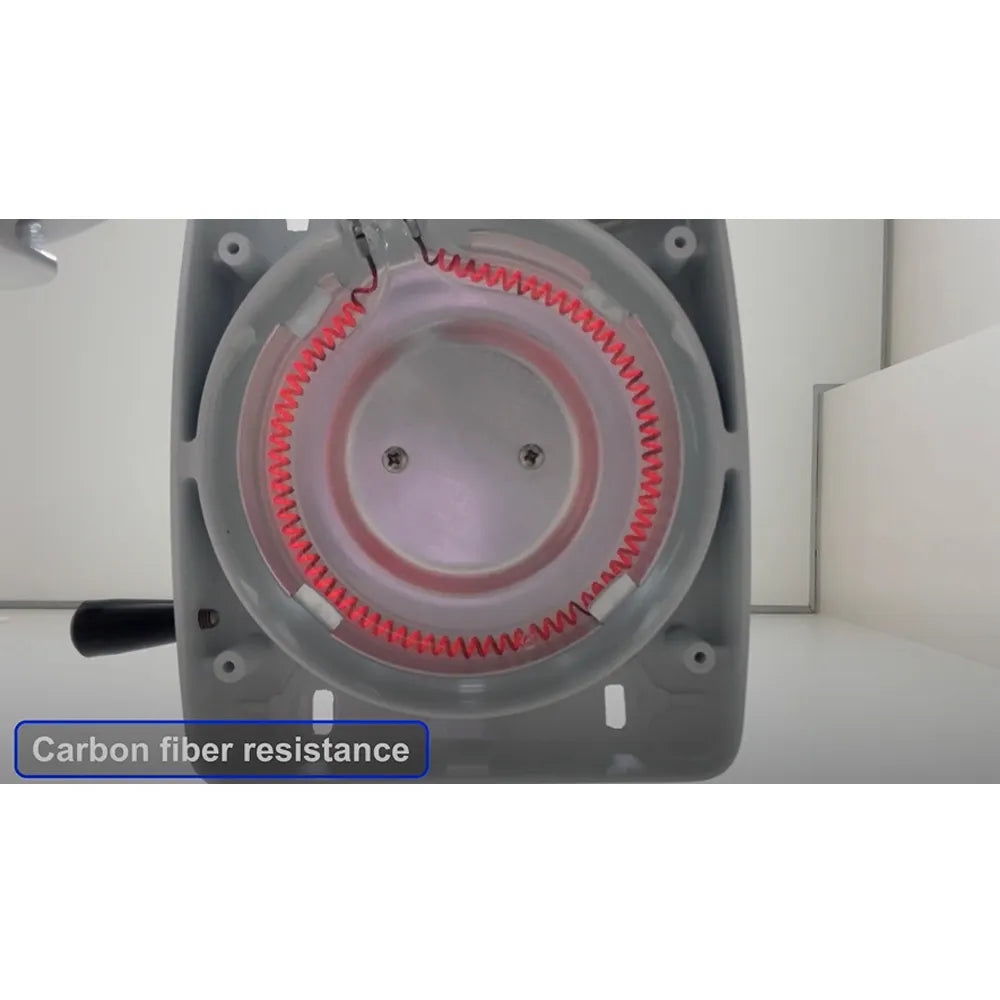
Electric characteristics:
- Voltage: 127V 60 Hz or 220V 50/60 Hz (+- 10%)
- Heating resistance power: 450 W
- Average energy consumption: 1.6 kWh per month (Using 10 times a day, for 22 days)
- Electrical shock protection: Class 1 equipment
Pneumatic characteristics:
- Plasticizing pressure: 2 bar (29.0 psi)
- Minimum air input pressure: 3 bar (43.5 psi)
- Maximum air output pressure: 8 bar (116 psi)
- Connection type: Quick coupling for 6 mm Ø hose
- Product dimensions (L x W x H) without packaging: 265 x 235 x 270 mm
- Product dimensions (L x W x H) with packaging: 310 x 270 x 310 mm
- Weight without packaging: 7.5 kg
- Weight with packaging: 8.5 kg
Environment:
- Location of use: Indoor use only
- Operating temperature: 5°C to 40°C
- Relative humidity: 5% to 90% (non-condensing)
- Maximum operating altitude: 3500 m
- Pollution degree: 2
- Protection degree: IPX1 (protected against splashing)
- Maximum noise level: 80 db (In the use position, 30 cm in front of the equipment)
- Product and parts duration: Indeterminate
Plate dimensions:
- Thickness: Up to 6 mm
- Round plate: From Ø 120 mm to Ø 134 mm
- Square plate: From 120mm x 120mm to 130mm x 130mm
Recommended Plates:
- Bracket fixation- Soft Plate 1.0 mm, Crystal Plate 0.3 mm
- Caps- Crystal Plate 0.3 mm.
- Matrix for composite resin- Milky Plate 0.6 mm, Soft 2.0 mm
- Temporary bridge- Milky Plate 0.6 mm, Soft 2.0 mm.
- Mouth Guard- 3.0 / 4.0mm Soft Plates.
- Bite Plate (Miorelaxation/ Bruxism)- Crystal Plate 1.0 / 1.5 / 2.0 / 3mm.
- Base plate- Glass Plate 1.0 / 1.5 / 2.0 / 3.0mm.
- Individual Trays- Crystal Plate 1.0 / 1.5 / 2.0 / 3mm.
- Trays for home whitening- Crystal Plate 0.3 mm, Soft Plate 1.0 mm.
- Study model packaging- Crystal Plate 0.3 mm.
- Surigical guide- Crystal Plate 1.0 / 1.5 / 2.0 mm.
- Fluoridation tray- 0.3mm Soft 1.0mm Crystal Plate.
- Orthodontic appliance (ALIGNER)- Crystal Plate 0.75 / 1.0 mm.
Packaging
Packaging
- 1 x PlastPress 220V
- 1 x Mold Holder
- 1 x Plate Template
- 1 x Power Cord
- 1 x Hose Extender
- 1 x Glass Beads 250g
- 1 x Instruction Manual
Direction to use
Direction to use
Installation:
- Carefully unpack the laminator and check that it has not suffered any damage during transportation.
- The laminator must be installed in a ventilated place, free from humidity, and excessive heat, and supported on a flat and level rigid surface. Do not embed or place any material between the support base and the bottom of the machine, so that this area remains free, allowing air circulation. Leave at least 20 cm free between the entire perimeter of the laminator and another object, for correct operation when its moving parts are extended/open.
- Check the local network voltage before connecting the laminator to the socket, remember that this machine does not have dual voltage, therefore, observe the supply voltage (220V) before turning it on. Variations in supply voltage of up to ± 10% of the nominal voltage are permitted.
- Connect the female end of the power cable to the input connector located on the back of the equipment. Attention: Press hard and make sure the insertion is complete. Connect the laminator power cord plug to the electrical outlet with a properly installed grounding system.
- Connect the compressed air network, with pressure between 3 and 8 bar (43.5 to 116 psi), to the quick coupling of the plasticizer air hose extender. Do not let the compressed air hose bend and form creases. This will interrupt or reduce the airflow, impairing its operation.
Instruction For Use:
- To start the laminating process, the machine must have the power cable connected to it and the electrical outlet with the correct voltage. There must also be a 6 mm diameter compressed air hose connected to the quick coupling of the hose extender of the laminator. The main switch must be off.
- Using the handle (pressure chamber lock handle), release the pressure chamber by turning the lock 180° and turning the heating unit (Heating unit) 180º to the left until it is in the rear position.
- Open the pressure chamber, pulling it upwards and to the left, using its handle (pressure chamber handle), until it is positioned with its opening facing upwards.
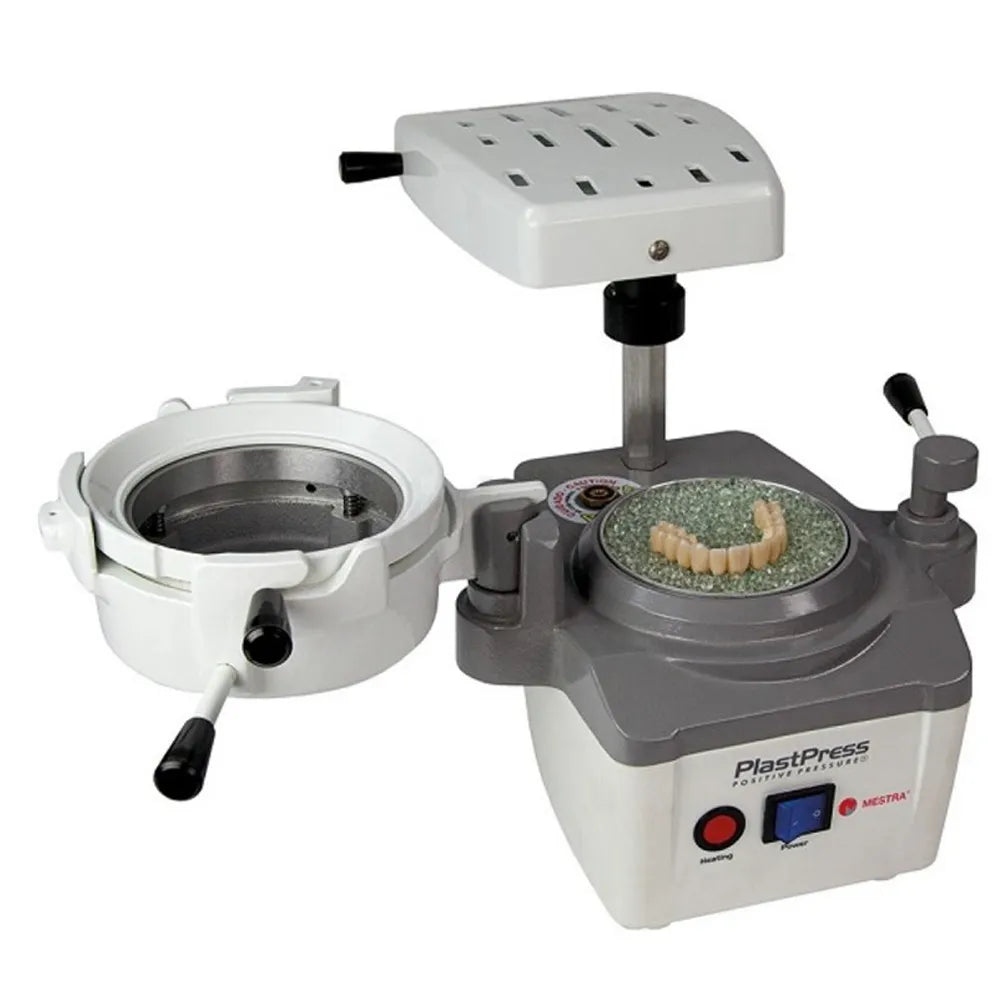
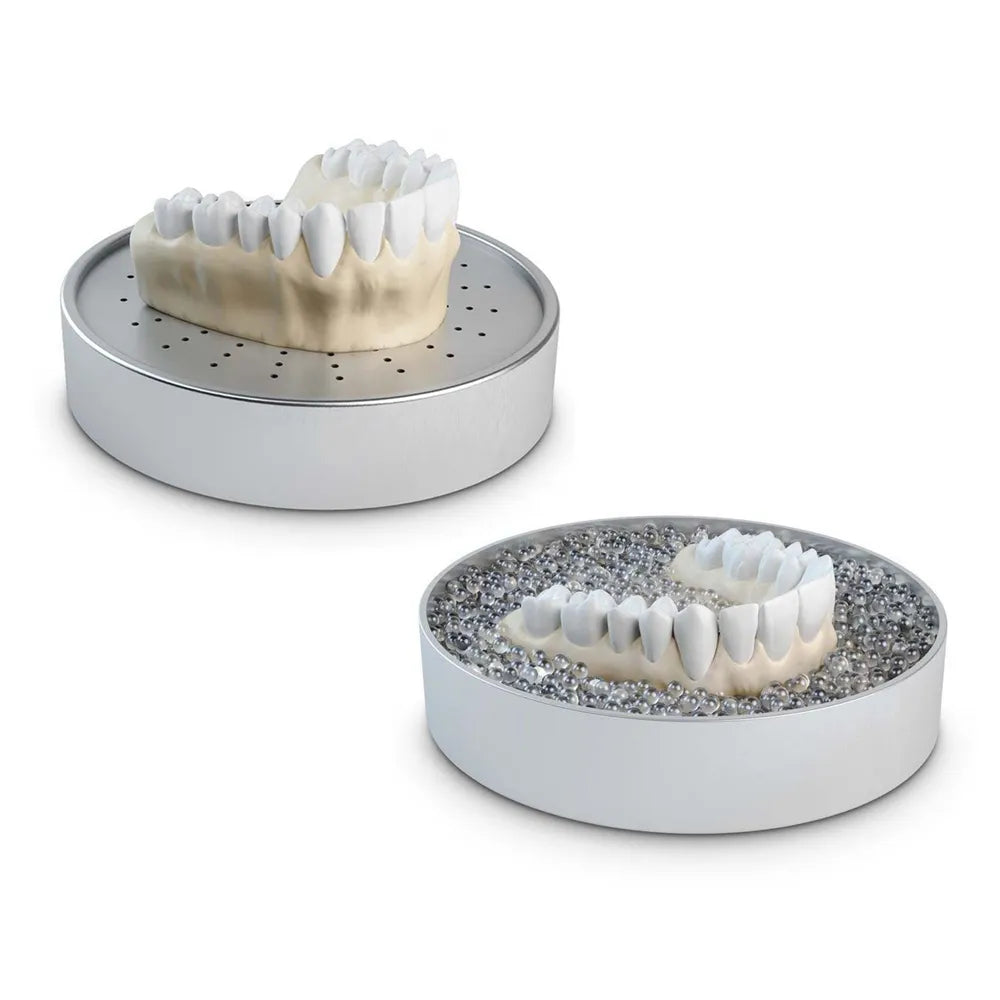
- Place the model in the model holder (model holder with flat and mug functions) and then position the assembly in the cavity in the cabinet lid (cabinet cover). Place the model in the model holder (model holder with flat and mug functions) and then position the assembly in the cavity in the cabinet lid (cabinet cover).
- The model holder can be positioned in two ways:
Mug position:
- Allows greater ease in removing the plates, especially when the model has retentions or when using rigid plates and/or with thicknesses equal to or greater than 1.0 mm.
- To use the model holder in this position, place the model on the mug side of the model holder and fill it with glass grit covering the retentive surface up to the height limit of the model holder. Then insert the assembly into the cavity in the cabinet lid.
- Note: During this operation, it is natural for the shot to come off the plate and fall onto the bench. To prevent this from happening, we suggest that the manipulation be carried out inside a container (tray).
Flat Position:
- Allows a copy of the entire extent of the model. For a better result, cut the model, eliminating its retentions and obtaining a flat base. Do not use a very tall model in this process, to reduce plate distortion. To use the flat side of the template holder (model holder with flat and mug functions), position the template holder in the cavity in the cabinet lid (cabinet cover) of the machine with the mouth facing downwards. Then position the model on the model holder.
- Important: Make sure that the cabinet lid is clean and free of residue to ensure that the model holder fits perfectly.
- To position the plate, move the handle (plate locking ring handle) of the locking ring (locking ring) to the right, in a counterclockwise direction, allowing the plate to be inserted.
- Position the plate to be molded in the opening of the pressure chamber on the compensation ring, so that it is well centered on the compensation ring.
- Position the plate's locking ring in the opening of the pressure chamber, ensuring that its handle and diametrically opposite pin coincide with the slots in the pressure chamber.
- Press the locking ring against the pressure chamber using its handle and pin as a guide and turn it clockwise to the left, locking the plate. Attention: It is important to hold the pressure chamber (03) with one hand, using the handle (07), in order to keep the assembly firm when locking the plate.
- Move the pressure chamber backwards until it reaches its end of travel and partially return the heating unit aligning it over the pressure chamber. In this position it will be possible to feel a "click".
- Turn on the main switch, thus starting the plate heating process. The blue lights on the general switch and the red lights on the resistance indicator LED will light up, indicating that the equipment and resistance are on. Attention: If the pressure chamber is not in the correct position for heating and its lock is not in the unlocked position, the resistance indicator LED will not light up and the plate will not be heated. The positive plasticization process requires adequate preheating of the plate. Do not operate this equipment without correct preheating.
Ideal plasticization point:
- Due to the existence of several types of plates (different materials and thicknesses), the ideal plasticization point is identified by changes in the plate and not by time. Therefore, it is the responsibility of each plate manufacturer to prescribe the most correct form of the ideal plasticization point.
- In general, the ideal point is observed by the change in color (brightness) for more opaque plates, that is, the plate will be shiny and transparent (e.g. milky plates) or by the flow of the plate by 10 to 12mm.
- Observe the plate heating process through the gap between the heating unit and the pressure chamber. For the first few uses, if in doubt, move the heating unit slightly backwards and, if greater heating is needed, return it to the one above the pressure chamber.
- When reaching the ideal plasticization point, move the heating unit back to the rear position. Caution: Do not allow the plate to be heated beyond the time indicated by its manufacturer to avoid overheating, rendering it unusable and making it necessary to clean the melted material inside the pressure chamber.
- Return the pressure chamber to its closed position (turning it forward counterclockwise and then to the right clockwise. At this point, the resistance indicator LED should go out.
- Lock the pressure chamber in position by turning its lock handle completely to the left, in a clockwise direction. If locking is difficult, it is because the plate locking ring and/or the pressure chamber are out of their correct position. Attention: Only activate the pressure chamber lock handle when the pressure chamber is correctly positioned in the closed position, thus preventing compressed air from escaping directly into the environment.
- Simultaneously with the pressure chamber locking, the air valve will activate (with its characteristic click) and the preheated plate will pressurize. During the pressurization time, the characteristic sound of compressed air being released into the pressure chamber will be heard. Attention: a small air exhaust noise is normal
- After approximately 15 to 20 seconds, depending on the thickness of the plate used, turn off the main switch to depressurize the pressure chamber. At this moment the air valve will close (with its characteristic click) and the flow of compressed air will stop. After complete depressurization, turn the pressure chamber lock handle completely to the right, counterclockwise, to release the pressure chamber opening. Attention: Never force the pressure chamber lock handle to try to open the pressure chamber before stopping the flow of compressed air by turning off the general switch. If this safety procedure is not followed, accidents may result in injury to users and damage to the product.
- Move the plate locking ring handle to the left, clockwise, to release it and open the pressure chamber. To do this, hold the pressure chamber handle with your other hand to ensure firm movement and keep the laminator in position. Afterwards, keeping the plate locking ring in a horizontal position, carefully open the pressure chamber with the other hand, pulling it upwards and to the left, using its handle , until it is positioned with its opening facing upwards. Remove the plate with the template holder. Note: If you are using the model holder in the mug function, when opening the pressure chamber, eventually the shot that was stuck in the plate may come loose.
- After removing the plate with the plasticized model, replace the locking ring in the pressure chamber, returning it to the initial position, that is, closed. Also return the heating unit to the front position, reducing the space occupied by the laminator during storage.
- Let the model cool for about 30 seconds before working on it.
- If the laminator is not used frequently, we recommend removing the power cord from the electrical outlet and disconnecting it from the compressed air hose. Attention: To remove the model and finish the plate, cut off the excess material with scissors, a utility knife, and a steel or carborundum disc, depending on the rigidity and thickness of the plate. For rigid plates or those above 1.0mm thick, we strongly recommend using the Mug Model Holder for the laminating process, as mentioned previously. The final finishing of the edges can be done with mounted stones, Scotch Brithe brushes or rubber discs.
Additional info
Additional info
- Country of Origin: Made in Brazil
Warranty
Warranty
- Manufacturer/Importer warranty of 1 Year against manufacturing defect.
- Service and Warranty are handled by the manufacturer/importer directly for this product.
Oralkart will not be liable to replace the Products and the liability to replace any such Product is that of the Manufacturer/Importer. - Oralkart and the Buyer acknowledge that the Products purchased/used are subject matter of the original Manufacturer/Importer’s warranties only.
- Any or all claims in relation to returns and replacement shall be made to the concerned Manufacturer/Importer only and Oralkart may assist the customer in registering a request to get the Product replaced or serviced.
- The Buyer acknowledges that the Products once sold will not be exchanged or taken back unless the seal of the package or the Product is intact or not altered in any manner or is not tampered as the case may be.
Product Related Questions
Product Related Questions
Question: What materials are compatible with the Bio-Art PlastPress Vacuum Forming Machine?Answer: The Bio-Art PlastPress is compatible with various types of plates made from different materials and thicknesses. It can handle round and square plates up to 6 mm thick, offering flexibility in material selection based on the specific application.
Question: How user-friendly is the Bio-Art PlastPress Vacuum Forming Machine?
Answer: The Bio-Art PlastPress is designed with ease of use in mind. It features intuitive controls and straightforward operation, making it accessible for dental professionals of all experience levels. Additionally, it comes with a comprehensive user manual that guides users through the operation process.
Question: How does the digital timer feature of the Bio-Art PlastPress enhance its functionality?
Answer: The built-in digital timer on the Bio-Art PlastPress ensures precise heating and cooling times, which helps in achieving consistent and reliable results in every use. This feature is particularly beneficial for maintaining accuracy and efficiency in dental appliance fabrication.
Share